 *update: I'm re-posting my old blog posts here on our new platform here. Please note that the dates displayed of when this was posted aren't accurate. It's been a while since my last post, even though I had planned to write a post a week. Let's be honest here, I can be a bit disorganized (okay, a lot if you ask my husband). Though not with getting orders made and shipped out on time :). But anyone else who can relate with struggling when it comes to schedules and (healthy) routines? I certainly do. I get easily distracted, which is often a bad thing, but it can lead to new discoveries too. Sometimes that which distracts me leads me to try out new things, like stenciling for example. A year ago I had never tried to stencil anything - besides perhaps during some early childhood school crafts projects. Anyone remember these? I never tried my hand at screen printing or silk screening, let alone creating silk screen stencils myself. I've always loved doing crafts, but I never thought I could create something that looked professionally made. Once I discovered silk screens that all changed. Now I've been stenciling on an array of different types of surfaces, from fabric to glass, to plastic, to canvas, and so on. But to keep this post from getting too long, here are the latest 3 things I've been trying:
Stenciling on paper cards Let's start with cards. These are so fun and super easy to do. So much so that our 10-year old daughter may have become addicted to making them. She loves getting creative with them and taught me a new technique using crayons, which she otherwise never uses anymore, to create an ombre background. Ombre is the French word for "color that is shaded or graduated in tone" BTW. Here's an example of the technique she used. 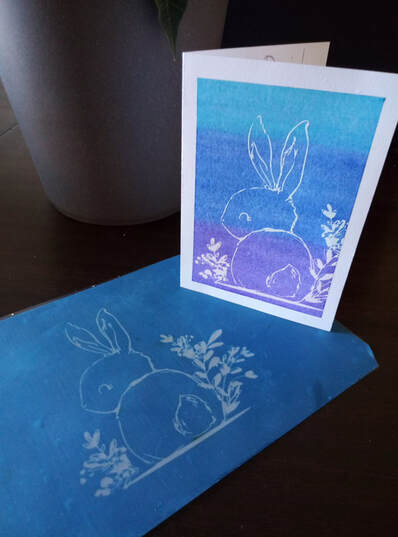 For the card in the picture, we used a store bought blank cards, painter's tape, school crayons, paper towels, one of our All Purpose Silkscreen Stencils, and water-based acrylic paint. Squeegee is optional. We used painter' tape to cover the edges of the card which we wanted to stay white, thus creating a border. Before applying the tape to your card, fuzz it first by sticking it to a towel or other high fiber fabric a few times. We did this by sticking it to our arms a few times first, which I would not recommend. The purpose of this is to make the tape a bit less sticky so it won't tear the paper later on when you take it off. Same goes for stenciling straight onto paper. i would recommend fuzzing the stencil before applying it to reduce the stickiness ever so slightly and avoid tearing the paper when taking it off - always use an All Surface type of stencil for paper! Making sure to position the card the way you want it with the bottom towards you and tape off the border. Using normal school crayons we choose 3 colors from dark to light to later fade into one another. Start by coloring the bottom third of your card with the darkest color crayon, lay it on thick. Then proceed with the medium color in the middle and finally, the lightest color for the top third. Go overboard with the coloring to really cover the paper, especially if you have somewhat textured paper cards. Now, scrunch up a piece of paper towel (kitchen towel) and rub it over the darkest layer first, taking off the excess crayon. You want the surface to be as smooth as possible. Start with the bottom and work your way up. When you move onto the next color make sure to use a clean part of your paper towel to avoid getting the darker color onto it. Always use a clean part of the paper towel to fade one color into the next, working your way up from the darker color into the lighter color. Once you've smoothed out your crayoned surface, double-check it by looking at it from an angle AND running your finger over the surface to check ti is completely smooth. Sometimes little lumps of crayon will get left behind and this will prevent your stencil from fully adhering to the surface and create bleeding (the paint goes underneath the stencil creating blotches you don't want). Once you're sure the surface is smooth, it's time to stencil. We used this super cute hand-drawn bunny design. I like to cut the corner off a stencil if there's space for it instead of writing on the back with a permanent marker. It seems to make it easier to peel the stencil off the clear foil backing (the carrier sheet) and there's only one way to line it back up. Plus I don't always have a permanent marker handy. Peel the stencil off its carrier sheet and center it onto your card. Because of the layer of crayon you don't have to fuzz the stencil before applying. Next, apply a small amount of water-based acrylic paint and spread it out over the stencil, fully covering the design. We used our fingers for this, but you can use a squeegee if you're not a fan of finger painting. Take off any access paint and remove the stencils (careful not to stretch it). Voila! Make sure to clean the stencil straight away or, if you can't do that for some reason, leave it to soak in a shallow tub of water until you're ready to clean it. Whatever you do, don't let the paint dry in the mesh part of the stencil. Finally, carefully take the painter's tape off and your card is done. stenciling on cars Yes, cars can be stenciled on using the same brand of water-based acrylic paint as used on the cards, believe it or not! Now, I confess that the logo on the van was stenciled on about a year ago, so not that recently. But it's still holding up great, despite being parked outside without shelter all year long and having gone through a bunch of (manual) car washes. Surprisingly, the acrylic paint is holding up nicely, yet it's easily scraped off using your fingernails if you want to get rid of it. We've done a few images on our van that we've decided to remove over time and it didn't leave any marks. It makes sense though, as it's metal and our All Surface type of stencils work on pretty much any smooth surface, metal included. Simply follow the instructions that we send with our stencils (no fuzzing needed for this surface BTW) and you can stencils anything onto your car from your logo or just a cool design. Just don't do it to someone else's car, unless you have their permission (or it's April Fools?). customized cake!  Who doesn't love cake? Now, first off full disclosure - our stencils have not been tested to be FDA approved for food items. Whether you want to use them on cakes or cookies is up to you and at your won risk. But we did it and survived. For our daughter's 10th birthday she wanted a complete Harry Potter themed birthday party. And since she belongs to the Hufflepuff house, what else could go on her birthday cake but the Hufflepuff crest? So I bought the image online off an Etsy shop and created a stencil. I also made this delicious gluten-free cake, as one of her friends has Celiac. I used fondant for the first time in my life because I figured I could stencil onto that using homemade gluten-free icing with black food coloring in it. The icing turned out more grey/silver rather than black, but hey, I'm no professional baker. I rolled out the fondant and applied my stencil over the top. I lightly rolled the rolling pin over the stencil once and then applied the frosting with a squeegee. I wasn't quite sure it was going to work, but I couldn't have been more happy with the result once I peeled the stencil off! Next I placed the stenciled fondant over the cake and cut off the excess. I added icing all around the sides of the cake and created a border on the top and sprinkled on some white chocolate stars. Finally, you may now be wondering, "Well, which of these three things won't she be doing again?". The answer is, I'll be doing them all again! The one thing I have tried and won't be doing again is using water-based metallic acrylic paints. Why? Because I've tried them in the past, using silver and gold metallic paints (both water-based acrylics) and they work great the first time around. But they seem to have tiny metallic particles in them, which clog up the mesh in the silkscreen stencils. They're simply a nightmare to clean out of your silkscreens and I haven't been able to rinse them out of my stencils fully despite my best efforts. So I steer clear of anything metallic if I intend to reuse the stencil, even if it states that it's water-based paint or ink.
Now, over to you. Which of these 3 things I tried did you find the most interesting? Which one/ones would you like to try? Let me know in the comment section below and feel free to share pictures! Happy crafting! Mariette
0 Comments
Leave a Reply. |
AuthorHi, I'm Mariette. I love crafting and make custom reusable silkscreen stencils, which I sell on our Etsy shop - SmartScreenStencils. ArchivesCategories |
 RSS Feed
